Luminaire installation - Information about the installation of LedStore products.
Led luminaire installation is usually a professional job and most of LedStore's luminaires are fixed mains mounted led luminaires. Plug-in transformers and luminaires can be connected to the socket by yourself without any worries. The consumer can also do the work on the low-current side himself, as long as he is familiar enough with the subject (12V, 24V).
The lamp shop Led Store Ltd manufactures / manufactures and imports all the products it sells, so customers can turn to LedStore for all product-related questions. Most of the products are LedStore branded. For transformers, we rely on Mean Well products for the majority of our products. We also do measurement and installation visits for consumer and business customers.
Installation of Led spotlights on ceilings
Installation of recessed led luminaires
The installation of led spots in the ceiling is done by sawing a mounting hole, where the spot is tightly fixed with springs. The spot models 9W and 15W directional and fixed round and square, known as Kantti, as well as the BJ033 spot can be daisy-chained with the Triac dimmable power supply supplied with the spot. The ModLed spot model also has a chainable junction box, the power supply is built into the module. If required, the power supply can be removed from the spot's mounting hole for maintenance. Care should be taken with the size of the mounting hole, as the spot collar is quite narrow on some of our models. We therefore recommend that you order a model lamp first, or check the size of the mounting hole with us before drilling the holes. This will make installation quick and easy.
Recessing depth
The spot 9W and 15W luminaires come with a power supply of 110x50x35mm. There is no need to install a protective cover or other fire protection on the ceiling, as the good thing about LEDs is their low operating temperature (around 50-60 degrees). The operating temperature is much lower than in incandescent or halogen lamps, for example, because the light output is based on intense heat. 15W spots and 8W ModLed spots run hotter than 9W spots, so 50 degrees is exceeded, but there is no fire risk with them either. LedStore spots have a cast aluminium body that efficiently conducts heat away along the entire body of the fixture. This keeps the fixture cool enough to last a long time. The correct installation of Led spots on the ceiling is therefore done by taking into account the structure of the ceiling.
The product information for each luminaire specifies the recess depth, i.e. the space required to install the spotlight, measured from the bottom of the plasterboard. Our most common model (directional 9W spotlight, 033) has a depth of 55 mm. The product can be mounted directly onto wood or plaster, but we recommend leaving some air on top of the module. even 1-2 centimetres is enough for a "ventilation reserve". The luminaire must not be installed directly against vapour barrier plastic or wool.
Construction of the top floor
Due to the construction of the cavity floor, usually there will be a vapour barrier on the face of the room, after the plaster or panel, with an insulator such as wool on top. In this case, a piece of plasterboard, for example, left over from drilling a hole, must be placed between the casing and the vapour barrier. In this way, the insulation will not push the luminaire downwards. It is also not advisable to install an LED inside a piece of insulation, even if the operating temperature is considerably lower than that of, for example, halogen. The more space the luminaire has to cool down, the cooler it will run, and the cooler the LED runs, the longer it will last. The power supplies are separate from the spot, which extends their lifetime because they are separate from the warming light source.
As spotlights are low-profile, they can therefore be installed in low spaces. A traditional "two-by-two" or cross-coiling with a 22mm board will suffice. So 49x49mm collimation + 13mm plaster = 62mm mounting space is enough for almost all our spot models.
Installation of a Led-panel luminaire on the ceiling
Recessed panel luminaire
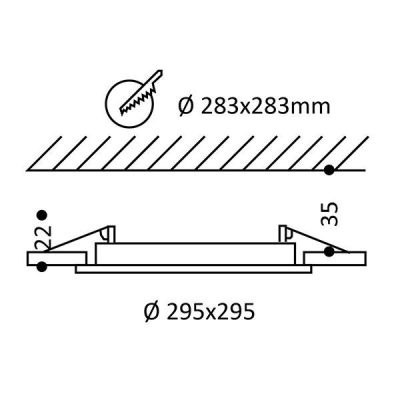
The installation of a led panel luminaire in the ceiling is also easy. Especially if space is limited, the panel is a good choice. Typically, a mounting depth of no more than 22 mm is required for the panel. For recessed panel luminaires, a square mounting hole is cut in the panel and a circular one in the ceiling, into which the luminaire is tightly fixed with springs. The rectangular panels have four springs, the largest 600×1200 panel has six springs and the circular plafonds have two springs. The power supply in all panel luminaires fits through the mounting hole for maintenance. The panel luminaire itself can also serve as a service hatch for other lighting devices. As a tip for sawing a square hole, especially in flat plaster ceilings, use a line laser, for example, to make the holes line up. In our largest panel, 600×1200, the straightness of the roof also plays a role in the success of the installation. In older houses, for example, where lighting is being replaced during renovation, there is a risk that the panel will not lay flat.
Installation of a surface mounted luminaire
For panels from size 300 upwards, 50 mm high surface-mounted frames are also available, which can be purchased separately. For round plafonds, a surface-mounting frame is available for model 240. The surface plafonds Surface 160, 280 and 380 are available with a fixed surface mounting frame. These have the transformers fixed in the luminaire body. The surface-mounted plafonds also require a professional electrician for installation, as they do not include a lighting socket. Surface mounted panel luminaires can be found in their own category: surface mounted led panel
Surface Mount Panel Lights - Surface Mount Panel Lights
The standard size of the power supply for smaller panel lights up to size 240 (diameter mm) is 110x40x25mm. For larger panel lights 600×600, 300×1200 and 600×1200 the size of the power supply increases. As with spotlights, there is no need to install a protective cover or other fire protection on the ceiling to install the LED panel, as the advantage of LEDs is their low temperature (around 50 degrees Celsius). The operating temperature is much lower than, for example, in incandescent or halogen lamps, where the light output is based on intense heat. LedStore's panels have a cast or framed aluminium frame, and an aluminium backplate, which effectively conducts heat away from the LED circuits that circulate around the perimeter of the luminaire. This keeps the luminaire cool enough for long life.
About the roof structure
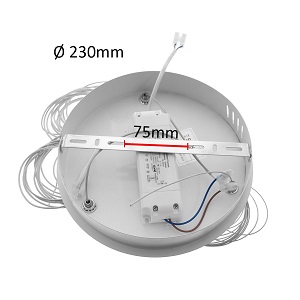
The product information for each luminaire specifies the recess depth, i.e. the space required to install the panel, measured from the bottom of the plasterboard. The product can be installed directly onto timber or plaster without risk of fire, but we recommend leaving some air on top of the panel or supporting the insulation upwards. 1-2 centimetres is sufficient. Due to the construction of the crawl space, usually the vapour barrier is the first to go. In this case, it is advisable to insert a transverse board or plasterboard, for example, between the insulation and the vapour barrier, if you suspect that the vapour barrier will not withstand the heat, or that the wool will sag. It is not advisable to install an LED inside a vapour barrier or other loose insulation, even if its operating temperature is considerably lower than that of, for example, halogen. The more space the luminaire has to cool down, the cooler it will run, and the cooler the LED runs, the longer it will last. The power supplies are separate from the transformer, and there is a connecting cable of about 20 cm to 40 cm between the panel and the transformer, depending on the panel. The transformer can be left on top of the panel, or placed to the side of the panel. With an additional cable, the transformer can also be led away from the luminaire, so that the luminaire can be installed in a different room from the transformer.
As panel luminaires are low-profile, no tall column is required. A traditional "two-by-two" or cross-stranding with 22mm board is sufficient. So 49x49mm collimation + 13mm plaster = 62mm mounting space is enough for all our panel designs.
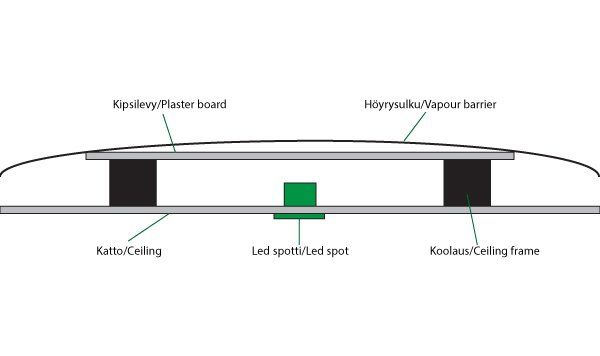
The BODY of the panel luminaire is only 11mm thick, so it can be installed without cutting the reinforcement on any material thicker than 11mm. The highest point of the panel luminaire is the spring (25mm), and the transformer which requires a height of 30mm. In the LED light installation picture below, the recommended gauge is 35mm to allow 5mm for the transformer before the ceiling.
Power supplies for LED luminaires
Each luminaire comes with its own power supply, except for led strips, where the transformer is selected according to the length of led strip required and the desired control mode. The power supplies for LED spotlights, LED spotlight kits and track lighting, UPPOAVA series and surface-mounted LED panels and LED ceiling lights are dimmable.
The power supplies of LedStore's flush-mounted spots and panels are chainable. CCT, i.e. colour temperature adjustable power supplies (DC power supplies) have a colour temperature selection switch on the side or after the power supply, as well as a chainable junction box. The junction boxes are either separate from the power supply or in the same housing as the power supply, as shown in the figure below. The colour temperature control on the side of the power supply, on the primary side, must not be adjusted when the luminaire is energised, as this will damage the luminaire. In models where the control is separate from the power supply, the lamp may be switched on when the colour temperature is adjusted.
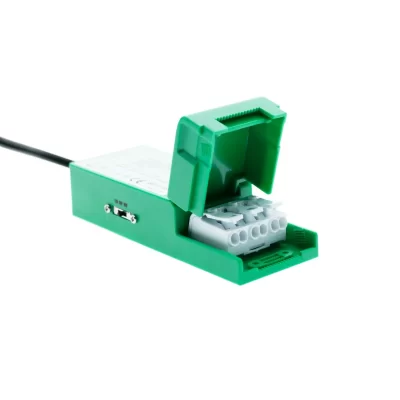
The most common standard transformer (TRIAC dimmable) January 2023:
Transformer size is: length 110mm, width 40mm, height 25mm
Panel 120 and 200
Plafond 120, 160, 200 and 240
Spots 9W, 15W (36VDC), DoubleCantilever (18W and 30W 36VDC)
Panel 300 includes interconnected transformer (110x40x23), colour temperature control switch (80x20x15 of three colour temperature options to be selected at installation), redesigned black, chainable junction box (90x55x25)
the 3W light sets(directional and damp) are ordered in sets of 3-8 and have a single transformer, the mA of which is rated by LedStore at the time of ordering. Transformer dimensions (125x45x30).
For led strips we have a wide range of power supplies, which can be found in their own product category in the online shop led transformers. These transformers can also be used as group transformers for spots and panels. Ask more about our sales!
Led strip installation
General Led strip installation instructions for all LedStore Led strip types. NOTE! LedStore is not responsible for product failure due to incorrect installation, even during the warranty period.
Please read the following instructions to ensure safe installation and use, and to ensure the longest possible life for your LED strip. In addition to this instruction, please refer to the feature and product information for your LED strip on the product pages of your online store.
- Use a transformer suitable for your LED strip. The voltage of your LED strip is either 12V or 24V. Your mains transformer must be in the same voltage range as your LED strip. The characteristics of the transformer and the driver will largely depend on the use of the led strip, i.e. dimming or colour temperature/colour change characteristics.
- Choose the power supply power so that it covers at least 10-15% more load than the led strip needs. Underloading is not harmful, overloading is harmful.
- A 14.4 W/m LED strip needs a power supply capable of carrying a load of at least 80 W for five metres. The power of the power supply is calculated by the formula: LED strip power per metre * required number of metres * 1.1. The multiplier adds a 10% margin so that the power supply is not overloaded. - Choose a moisture-protected strip IP65 for wet areas, unless the led aluminium profile is moisture-protected. The led aluminium profile is resistant to splashing water. Moisture-proof also for dusty areas, unless the profile is used without a diffuser or cover. LedStore aluminium profiles are supplied with a plastic cover.
- We do not recommend installing the LED strip in room temperatures above 50 degrees Celsius, as this will shorten the life of the LED strip.
- Unroll the LED strip from the roll and check the operation of the LED strip by switching on the power for a short time. Make sure that the LEDs are lit before installing the strip.
NOTE! If the LED strip is on a roll, the testing should only take a short time, a few tens of seconds at most, so that the LED strip does not get too hot while on the roll and start to melt the adhesive tape. - The LED strip must not be folded, pulled or twisted to prevent it from cracking from the inside. If it breaks, typically one or more of the LED circuits between the break points may go out (LED circuits in series), but the other parts of the strip will work (strip sections connected in parallel). The tape can be repaired by removing the damaged section, and re-soldering the tape whole.
- Work on the low-current side may be done by the consumer, i.e., the LED strip installation may be done when you are familiar with the subject, and get a plug-in transformer to connect the LED strip to the mains.
- The LED strip may be cut and soldered at the points marked on the strip. The tape is marked +. After cutting, any moisture protection is restored with a drop of silicone at the cut point.
- LedStore's LED strips are always mounted on an aluminium profile or metal to ensure that the heat generated by the LED strip is dissipated and the strip's promised operating hours of around 50 000 are achieved.
Led wall luminaire installation
LedStore offers a range of recessed and recessed wall lights. All wall lights have their own power supply in the body of the luminaire, and the luminaire is installed directly into the mains power supply. The luminaires are not chainable. Most wall luminaires are not dimmable. Exceptions are the FUNK wall luminaire, and the XL Cubic which have a triac dimmable power supply. Some wall lights are also available with a plug-in lead on request (Led wall light Night, Night Blade and Loop). Installation instructions included in the package.

Installation of Led pendant luminaire
LedStore pendant luminaires are for the most part to be installed by an electrician, as they do not come with a lighting socket. They have integral light sources. The mains wiring is in the switch box (sugar loaf) in most of the luminaires. All LedStore pendant luminaires are installed by removing the hook cover and attaching the mounting cup directly to the ceiling. The RINKELI luminaires have screw locations directly on the pendant housing.
Installation of Led pendants
Yard mounted pillars are mains mounted, non-retractable, fixed led luminaires which are fixed by an electrician from their mounting plate either to the mounting foot, or to the terrace deck. The Pillar FUNK and Pillar TILT2 have a hollow body, so they can be chained inside the tube. Otherwise, chaining is generally carried out in a film box next to the luminaire, for example.

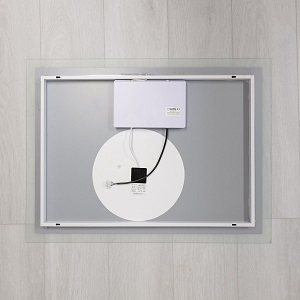
Installation of LED reflectors
Led mirrors include a plug, so you can install the mirror yourself at home. The plug can also be removed and the mirror can be installed as a fixed installation. The mirrors are hung on 2-4 screws. The frame of the mirrors has pre-drilled holes for the screws, but you can drill new holes for the screws anywhere in the tubular frame if necessary.
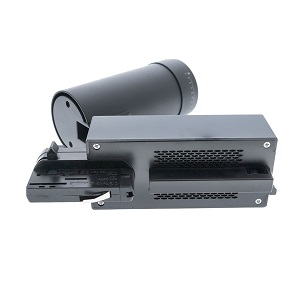
Installation of Led track lighting
The ZOOM and FOKUS three-phase track-mounted LED track lights can also be installed by the consumer himself, as the light is attached to the track with a simple quick-release fastener. Phase 1, 2 or 3 is selected from the rotary control on the power supply of the track lighting unit. FOKUS also offers a choice of colour temperature. LedStore does not directly sell the 3-phase rail. The rail usually comes with the electrician, also installed by us.
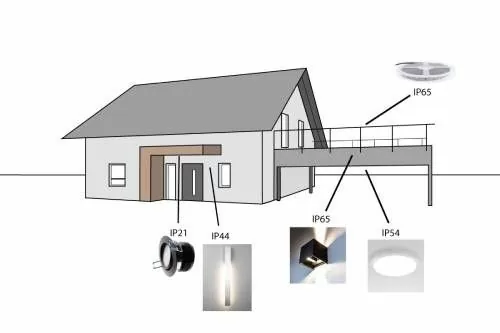
Led luminaire installation - enclosure classifications, dust and moisture protection
LedStore's luminaires and ballasts/power supplies have a wide range of enclosure ratings to suit different needs and spaces. Moisture and dust protection ranges from IP21 (direct overhead drip-proof, for dry installation) to IP67 (dust and waterproof). The picture below shows examples of installation locations in the home yard, and examples of LedStore products that are suitable for them.
Installation of the luminaire in a damp location
When installing the luminaire, the protection classes of the luminaire are taken into account. Here is a list of typical IP classes:
- IP21 led luminaires: suitable for a location where the water point can be measured at least 120cm from the water point, on the ceiling if the room height is at least 225cm.
- IP44 led luminaires: all lighting locations, at least 170cm from the floor.
- IP54 led luminaires: the same rules apply as for IP44 bathroom luminaires.
- IP65 led luminaires: applies the same rules as IP44 bathroom luminaires, but the luminaire itself is resistant to direct water.
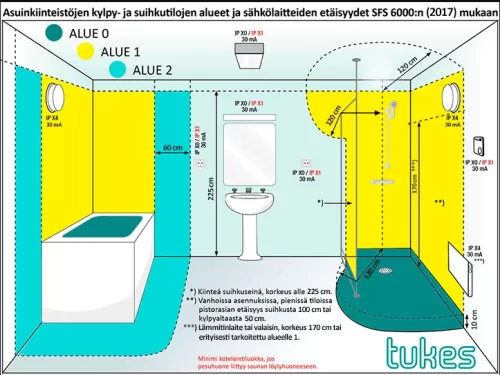
Please note that for bathroom lighting matters, only the latter number in the IP class counts. The first number is the dust rating.
When installing in damp locations, we recommend following the guidelines/regulations for electrical equipment issued by Tukes, for example, on the placement of equipment in bathrooms and showers in residential buildings.
Luminaire installation - Lighting control
LedStore luminaires can be installed with a wide range of lighting controls, from on/off switch operation, to programmable colour control. The main part of the luminaire control, i.e. dimming and possible colour temperature (CCT), or colour (RGB) control is the choice of transformer/power supply. Almost all our luminaires and LED strip are 24VDC DC voltage controlled, making systems based on DALI (monochrome and CCT, RGB lights), TRIAC (monochrome lights), PUSH DIM (monochrome lights) and 1-10V (monochrome lights) controls compatible with our lights.
In addition, wireless control systems are compatible with RF (radio frequency) (closed loop, "basic" wireless control systems).
Zigbee based (open standard) control systems. For these methods we have buttons and receivers / transformers with receiver in our own range.
Lighting control for installation
All control systems have the same installation method. The luminaires (led panels, led spots, led strip) will have a group transformer or control board that controls all the luminaires connected to it. In other words, there will be no transformers for each luminaire.
LedStore's luminaires are largely 24V CCT controlled, so the installation work after the transformer is done by the user.
We have written an article on Zigbee smart control from an installer's perspective.
Home control systems for which we have luminaires:
- on/off for virtually all lighting fixtures
- for dimming triac power supply lamps, i.e. most of our luminaires, we use TRIAC transformers such as Casambi, Plejd, etc. for dimming, and DALI transformers are available for panels, spots, LED strips for installation in KNX systems, etc
- Colour temperature control CCT or colour adjustable RGB transformer types DALI, RF Zigbee, "basic" RF. Bridges and applications for the Zigbee protocol are available from Philips, Samsung, Tuya, IKEA, Google, Home Assistant, etc.
We have more information about the dimming here: https: //ledstore.fi/info/himmennys
You can find a lot of information about smart control in our blog posts, by searching for the word Zigbee in the content. Or find information by visiting the Zigbee category.
We are happy to help you with all your lighting control needs! Contact us!
Installation is often electrical work
Reminder! Keep in mind that not all lighting fixtures should be installed by yourself. Putting on a ceiling light may sound easy, but with the help of an installer it can be done safely and securely. For large luminaires, two men are often needed.
Frequently asked questions about installation
I WANT TO REPLACE AN OLD LIGHT SOCKET IN MY KITCHEN. CAN I DO IT MYSELF?
No, you can't. It's an electrical job. The installer will remove the light socket and replace it with a corner socket (led strip for installations) or a new light socket
INSTALLATION OF THE CEILING LIGHT ITSELF: ON THE HOOK COVER
The hook cover is the traditional white cover with a J-shaped hook sticking out of it and a plug for the light bulb. These are found in all new properties.
If you have a fixture with a hanging loop and a plug ready to go, you don't need us or any other installers. Just plug in the plug and hang the fixture. Finish.
If your fixture is missing a plug, they are sold in all hardware stores and supermarkets. They usually come with a sugarplug/switch strip. The wires together in the same colours opposite each other. Plug in and light up the house.
THESE ARE EASY, CAN YOU INSTALL A PENDANT LIGHT YOURSELF?
Always remember to turn off the fuse before installing the lamp for safety! So called "safety light". The connection of fixed luminaires is only allowed by a qualified electrician. If you don't know what you are doing, leave the installation of a ceiling light bulb to a professional - Electrical safety first!
I ORDERED A LIGHT FITTING INSTALLATION. I ALSO HAVE OTHER ELECTRICAL WORK TO DO, DO YOU DO THAT TOO?
No, we do not. We only do light fitting installations.
CEILING LIGHT INSTALLATION IN A JEWELLERY BOX
LedStore's RINKELI or Pintaplafondi luminaires go directly on the jewel case. Many other luminaires can also be mounted directly on the jewellery box, provided they have a mounting screw and ready-made screw slots for the same hole spacing. The existing hook cover must be removed and the ceiling lamp's own fixing screw with the same screws must be fixed to the ceiling. If the wires are clearly marked brown and blue, the sugarcane installation can be accomplished by connecting the correct colours to each other.
In case you don't know what you are doing or are in any doubt. Ask for an installer to come out. Always remember to turn off the fuse first!
DIY CEILING LIGHT INSTALLATION: JUST THE HOOK AND A SUGAR CUBE
In older homes, only the wires come out of the ceiling and maybe a hook next to it. Installing these requires a lot of attention. If you don't have a piece of sugar in the ceiling and the wires are a strange colour, I recommend an installation service. If everything is clearly marked brown and blue, the sugarcane installation is accomplished by connecting the correct colors to each other and safely installing the fixture. Always remember to turn off the fuse first.
INSTALLATION OF A CEILING LIGHT DIRECTLY ON THE CEILING
For example, a Panel 600×600 or 600×1200 luminaire has such a large surface frame that it cannot be attached to a jewel case. They must be mounted directly on the ceiling. First screw in the frame and only then cast. Other similar fixing methods are used for larger pendant luminaires.
Note! A ceiling-mounted luminaire can be interpreted as a fixed luminaire, the installation of which is only permitted to an electrician. If you do not know what you are doing or are in any doubt. Ask for an installer to come to the site. Always remember to turn off the fuse first!
INSTALLATION OF A RECESSED LUMINAIRE
Recessed luminaires are usually spotlights or Led panels/led plafonds. The electricity is carried from luminaire to luminaire inside the ceiling and fixed to the luminaire. The installation of a recessed luminaire is electrical work if the operating voltage of the luminaire is above 36V. It is also worth checking the wiring inside the structure.
For example, although LedStore's CCT adjustable luminaires are 24V and you can install them yourself with their own wiring harness, it may make sense to ask for help.
If you don't know what you're doing or are in any doubt. Ask for an installer to come and see you. Always remember to turn off the fuse first!
Luminaire installation service
Did you know that LedStore is the place to get a light fitting for your ceiling? Kitchen partition lights installed. We do installation work in the Helsinki area and you can find out more about our service and order here:
LedStore's installation service